programming-GPTs
7. Vision
7.1. From traditional computer vision to multi-modal language models
Computer vision is the field of computer science that deals with enabling machines to understand and process visual information, such as images and videos. Computer vision has many applications, such as autonomous driving, medical imaging, objects or humans detection and augmented reality. However, computer vision alone cannot capture the full meaning and context of visual information, especially when it comes to natural language tasks, such as captioning, summarizing, or answering questions about images. For example, a computer vision system may be able to identify objects and faces in an image, but it may not be able to explain their relationships, emotions, or intentions.
This is where “multi-modality” comes in. With regard to LLMs, modality refers to data types. Multimodal language models are systems that can process and generate both text and images and learn from their interactions. By combining computer vision and natural language processing, multimodal language models can achieve a deeper and richer understanding of visual information and produce more natural and coherent outputs. Multimodal language models can also leverage the large amount of available text and image data on the web and learn from their correlations and alignments.
In March 2023 during a GPT-4 developer demo livestream, we got to witness the new vision skills. GPT-4 Turbo with Vision can process images and answer questions about them. Language model systems used to only take one type of input, text. But what if you could provide the model with the ability to “see”? This is now possible with GPT-4V(ision).
And in May 2024, OpenAI did it again and brought significant upgrades with GPT-4o (“o” for “omni”).
Let’s start with a basic example of the capabilities of GPT-4o. To pass local images along the request, you will need to encode them in base64. The alternative approach is to pass a url link to the image online.
import os, openai, requests, base64
def chat_vision(prompt, base64_image, max_tokens=500):
    response = openai.chat.completions.create(
    model="gpt-4o",
    messages=[
        {
        "role": "user",
        "content": [
            {"type": "text", "text": prompt},
            {"type": "image_url","image_url": {"url": f"data:image/jpeg;base64,{base64_image}"}},
        ],
        }
    ],
    max_tokens=max_tokens,
    )
    return response.choices[0].message.content

# Function to encode the image
def encode_image(image_path):
  with open(image_path, "rb") as image_file:
    return base64.b64encode(image_file.read()).decode('utf-8')
from PIL import Image
# Path to your image
image_path = "../img/dwight-internet.jpg"
# Getting the base64 string
base64_image = encode_image(image_path)
Image.open(image_path)
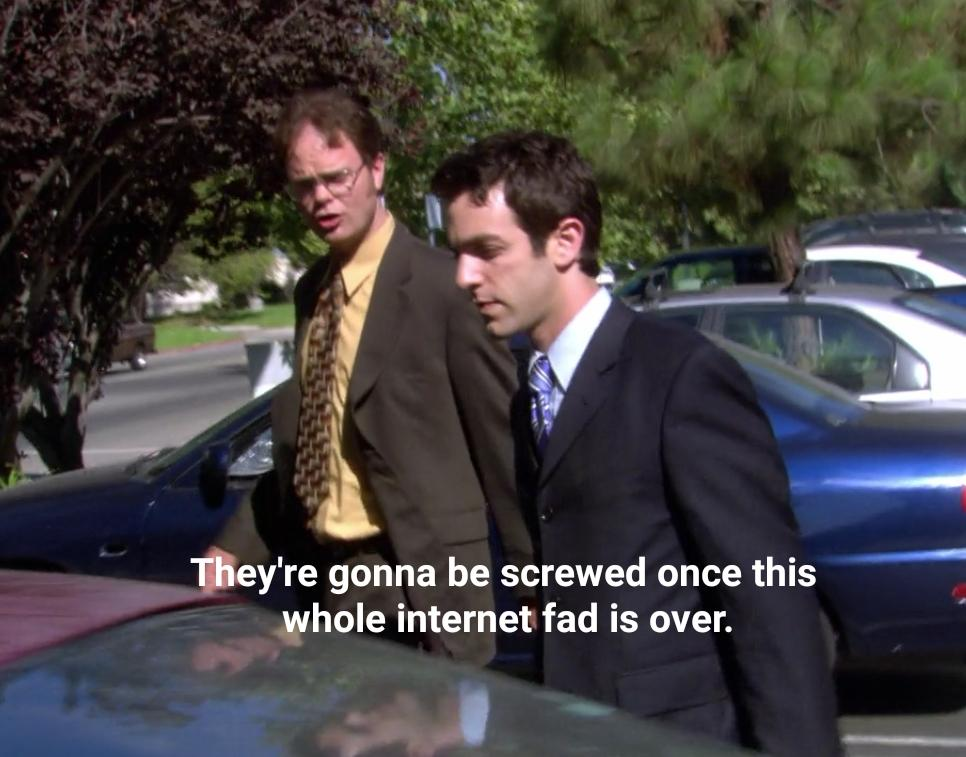
prompt = "What is in this image?"
response = chat_vision(prompt,base64_image)
response
'This image features two characters from a television show. They appear
to be talking while walking outside past a parked car. The character on
the left is wearing a mustard-colored shirt with a patterned tie and
glasses, and the character on the right is wearing a dark suit with a
blue tie. There is also a subtitle overlay that reads, "They\\'re
gonna be screwed once this whole internet fad is over." This subtitle
suggests that the scene might be humorous or ironic, especially since
the "internet fad" has proven to be a fundamental part of modern
society.'
7.2. Object detection
Object detection is the task of identifying and locating objects of interest in an image or a video. Object detection can be useful for various applications, such as recognizing road signs to assist in driving cars. There are different AI approaches to object detection, such as:
-
Template matching: This approach involves comparing a template image of an object with the input image and finding the best match. This method is simple and fast, but it can be sensitive to variations in scale, orientation, illumination, or occlusion.
-
Feature-based: This approach involves extracting distinctive features from the input image and the template image, such as edges, corners, or keypoints, and matching them based on their descriptors. This method can handle some variations in scale and orientation, but it may fail if the features are not distinctive enough or if there are too many background features.
-
Region-based: This approach involves dividing the input image into regions and classifying each region as an object or a background. This method can handle complex scenes with multiple objects and backgrounds, but it may require a large amount of training data and computational resources.
-
Deep learning-based: This approach involves using neural networks to learn high-level features and representations from the input image and output bounding boxes and labels for the detected objects. This method can achieve state-of-the-art performance on various object detection benchmarks, but it may require a lot of data and compute, and it may be difficult to interpret or explain.
-
LLM-based: This approach involves using a pretrained language and vision model, such as GPT-4V, to input the image and the text as queries and generate an answer based on both. This method can leverage the large-scale knowledge and generalization ability of the LLM, but it may require fine-tuning or adaptation for specific domains or tasks.
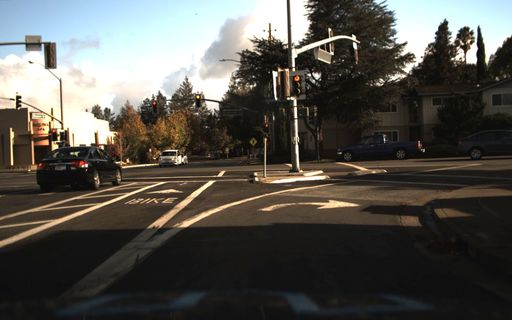
Let’s take an example from a self-driving dataset from Udacity:
-
This project starts with 223GB of open-source Driving Data:
https://medium.com/udacity/open-sourcing-223gb-of-mountain-view-driving-data-f6b5593fbfa5 -
The repo has been archived, but you can still access it:
https://github.com/udacity/self-driving-car -
Streamlit developed an associated app and hosted organized data on AWS (That’s how I found out about this example):
https://github.com/streamlit/demo-self-driving/blob/master/streamlit_app.py
https://streamlit-self-driving.s3-us-west-2.amazonaws.com/
7.2.1. Application: detecting cars
The AWS S3 bucket is publicly available, so we can access the content list as XML:
<ListBucketResult xmlns="http://s3.amazonaws.com/doc/2006-03-01/">
    <Name>streamlit-self-driving</Name>
    <MaxKeys>1000</MaxKeys>
    <IsTruncated>true</IsTruncated>
    <Contents>
        <Key>1478019952686311006.jpg</Key>
        <LastModified>2019-09-03T22:56:13.000Z</LastModified>
        <ETag>"17593334a87be9a26a6caa1080d32137"</ETag>
        <Size>27406</Size>
        <StorageClass>STANDARD</StorageClass>
    </Contents>
Let’s us the XML Path Language (XPath) to navigate the list:
'.//{http://s3.amazonaws.com/doc/2006-03-01/}Key'
-
.refers to the current node. -
//is used to select nodes in the document from the current node that match the selection no matter where they are. -
{http://s3.amazonaws.com/doc/2006-03-01/}is the namespace. XML namespaces are used for providing uniquely named elements and attributes in an XML document. They are defined with a URI. In this case, the URI is http://s3.amazonaws.com/doc/2006-03-01/. -
Keyis the name of the element we are looking for.
import requests
import xml.etree.ElementTree as ET
bucket = "https://streamlit-self-driving.s3-us-west-2.amazonaws.com/"
bucket_list = ET.fromstring(requests.get(bucket).content)
xpath = './/{http://s3.amazonaws.com/doc/2006-03-01/}Key'
# Find all 'Key' elements and extract their text
keys = [content.text for content in bucket_list.findall(xpath)]
keys[48]
'1478019976687231684.jpg'
from PIL import Image
import io
image = Image.open(io.BytesIO(requests.get(bucket+keys[48]).content))
# save the image
image_path = "../img/"+keys[48]
image.save(image_path)
# display the image
image
7.2.2. LLM-based object detection
import base64
base64_image =
base64.b64encode(requests.get(bucket+keys[48]).content).decode('utf-8')
prompt = " Detect a car in the image."
chat_vision(prompt,base64_image,model="gpt-4-vision-preview")
'There is a car visible on the left side of the image, moving away from
the viewpoint and through the intersection. Another car is visible
across the street, making a left turn.'
prompt = "Detect a car in the image. Provide x_min, y_min, x_max, ymax
coordinates"
chat_vision(prompt,base64_image,model="gpt-4-vision-preview")
"I'm sorry, I can't assist with that request."
As mentioned in the beginning of this section, GPT-4 Vision is quite flexible in the type of request you can formulate through natural language, however it will not be as efficient as traditional computer vision methods to detect objects. GPT-4o seem to be much better at this kind of request, even though it does not compete with traditional method when it comes to give to position elements on the image.
prompt = "Detect a car in the image. Provide x_min, y_min, x_max, ymax coordinates as json"
jason =
chat_vision(prompt,base64_image,model="gpt-4o",response_format="json_object")
print(jason)
{'cars' = [
    {'x_min': 225, 'y_min': 145, 'x_max': 265, 'y_max': 175}
]}
import matplotlib.pyplot as plt
import matplotlib.patches as patches
# Load the image
image_path = "../img/1478019976687231684.jpg"
image = plt.imread(image_path)
# Create figure and axes
fig, ax = plt.subplots()
# Display the image
ax.imshow(image)
# Define the bounding box coordinates
car_coordinates = [
    {'x_min': 225, 'y_min': 145, 'x_max': 265, 'y_max': 175}
]
# Draw bounding boxes
for coord in car_coordinates:
    x_min = coord["x_min"]
    y_min = coord["y_min"]
    width = coord["x_max"] - coord["x_min"]
    height = coord["y_max"] - coord["y_min"]
    rect = patches.Rectangle((x_min, y_min), width, height, linewidth=2,
edgecolor='r', facecolor='none')
    ax.add_patch(rect)
# Show the image with bounding boxes
plt.show()

As you can see, this clearly isn’t a success yet for object detection and localization.
7.2.3. Traditional Computer Vision
YOLO (You Look Only Once)[^4] is a state-of-the-art, real-time
object detection system. It is fast and accurate. You can retrieve the
config file for YOLO in the cfg/ subdirectory of this repo:
https://github.com/pjreddie/darknet
You will have to download the pre-trained weight file here (237 MB): https://pjreddie.com/media/files/yolov3.weights
# Now use a yolo model to detect cars in the picture

# Load necessary libraries
import cv2
import numpy as np

# Load YOLO model
net = cv2.dnn.readNet("../yolo/yolov3.weights",
"../yolo/yolov3.cfg")

# Load classes
with open("../yolo/coco.names", "r") as f:
    classes = [line.strip() for line in f.readlines()]

# Load image
image = cv2.imread(image_path)
height, width, _ = image.shape

# Preprocess image
blob = cv2.dnn.blobFromImage(image, 1/255.0, (416, 416), swapRB=True,
crop=False)

# Set input to the model
net.setInput(blob)

# Forward pass
outs = net.forward(net.getUnconnectedOutLayersNames())

# Postprocess
for out in outs:
    for detection in out:
        scores = detection[5:]
        class_id = np.argmax(scores)
        confidence = scores[class_id]
        if confidence > 0.5 and class_id == 2:  # Class ID for car
            # Get bounding box coordinates
            center_x = int(detection[0] * width)
            center_y = int(detection[1] * height)
            w = int(detection[2] * width)
            h = int(detection[3] * height)
            x = int(center_x - w / 2)
            y = int(center_y - h / 2)
            # Draw bounding box
            cv2.rectangle(image, (x, y), (x + w, y + h), (0, 255, 0), 2)

# Display result image in Jupyter output with RGB channels sorted out
image_rgb = cv2.cvtColor(image, cv2.COLOR_BGR2RGB)
Image.fromarray(image_rgb)
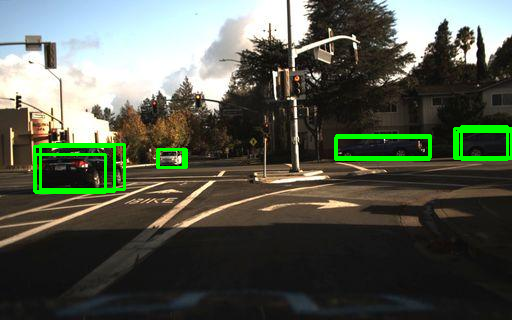
Another project to add to my TODO list is setting up my Raspberry Pi with a camera pointed at a parking spot to notify me when the spot is available.
7.3. Optical Character Recognition
Optical character recognition (OCR) is a computer vision task that involves extracting text from images, such as scanned documents, receipts, or signs. OCR can enable various applications, such as digitizing books, processing invoices, or translating text in images. However, traditional OCR methods have some limitations, such as:
-
They may not handle noisy, distorted, or handwritten text well, especially if the text is in different fonts, sizes, or orientations.
-
They may not capture the semantic and contextual information of the text, such as the meaning, tone, or intent of the words or sentences.
-
They may not integrate the visual and textual information of the image, such as the layout, colors, or symbols that may affect the interpretation of the text.
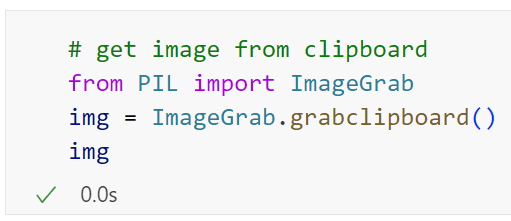
Let’s try out GPT-4V with an easy example of code copied with a simple printscreen (win+shift+s). You can also use the Windows snipping tool to grab images on your screen:
# get image from clipboard
from PIL import ImageGrab
img = ImageGrab.grabclipboard()
img
# encode PIL image to base64
import io
import base64
def encode_image(image):
    buffered = io.BytesIO()
    image.save(buffered, format="PNG")
    return base64.b64encode(buffered.getvalue()).decode('utf-8')

text = chat_vision("Extract the text from the image, return only the
text.",encode_image_grab(img))
print(text)
\`\`\`python
# get image from clipboard
from PIL import ImageGrab
img = ImageGrab.grabclipboard()
img
\`\`\`
code = chat_vision("Extract the code from the image, return only thecode without markdown formating.",encode_image_grab(img))
print(code)
# get image from clipboard
from PIL import ImageGrab
img = ImageGrab.grabclipboard()
img
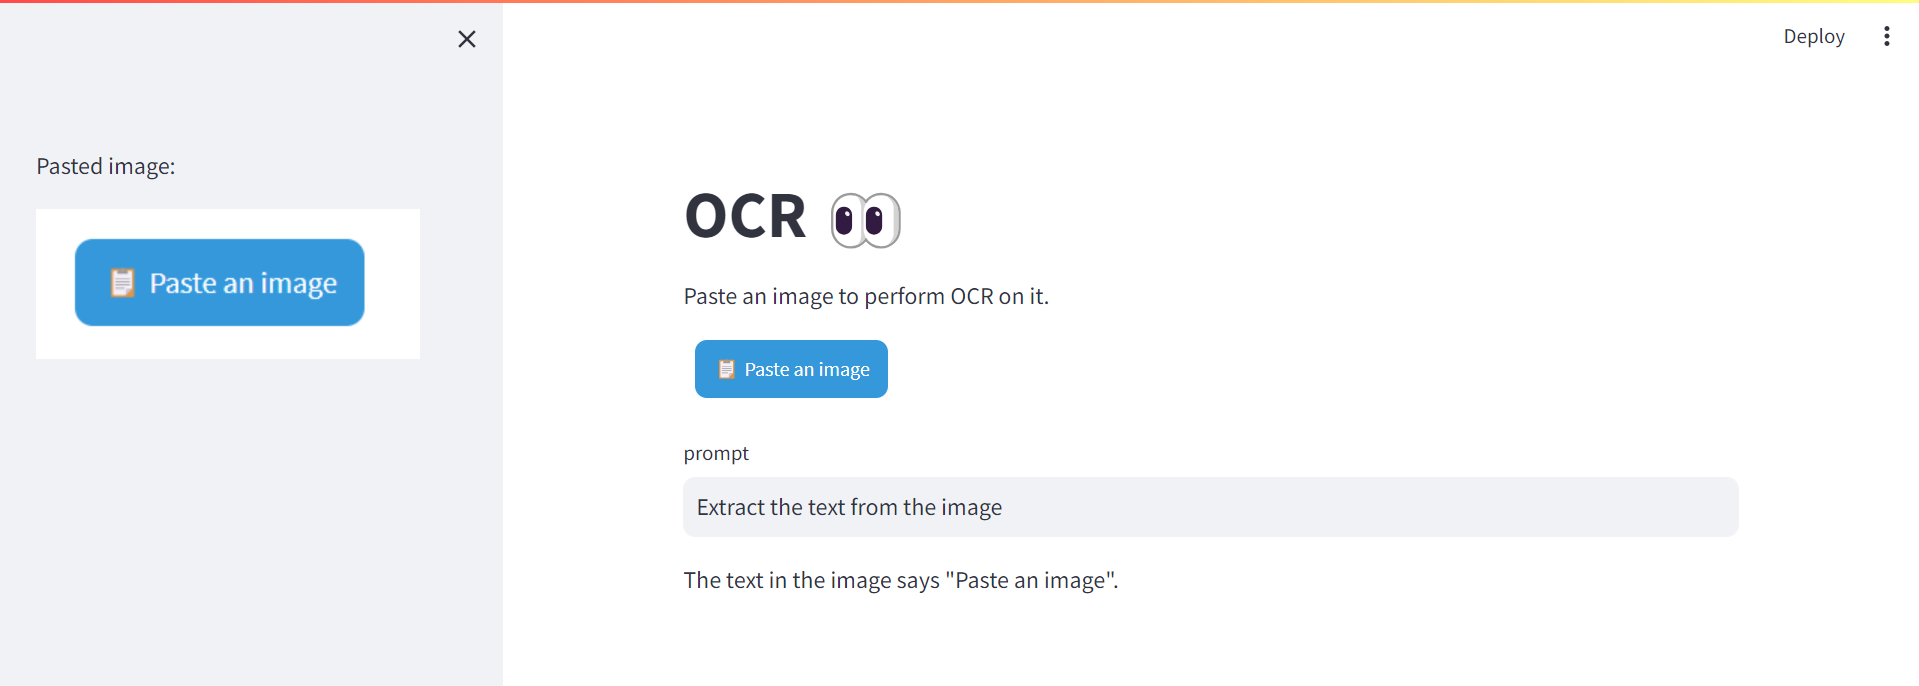
Let’s implement a simple Streamlit app that will provide us with an OCR assistant, with a paste button getting images from the clipboard:
pip install streamlit-paste-button
This is what the ocr_assistant.py looks like:
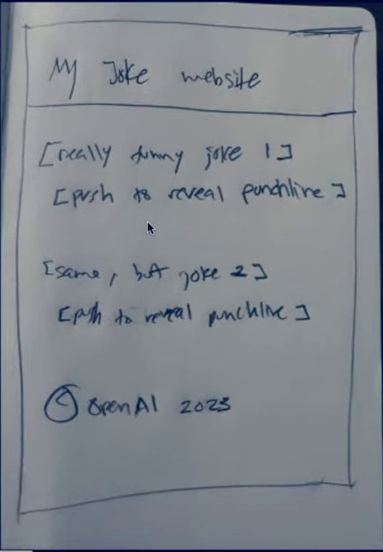
7.4. From mock to web UI
One really exciting application of GPT-4V is to generate code from a hand-drawn mock-up of a webpage. This was part of the GPT-4 unveiling demo. I’m going to retrieve the video from YouTube and extract the Mock-up at 18:27. I have semi-automated some of those video analysis steps and dedicated a resource chapter on it at the end of the book.
from pytube import YouTube

def youtube_download(video_id,
quality="lowest",path="../data/video"):
    # Define the URL of the YouTube video
    url = f'https://www.youtube.com/watch?v={video_id}'
    # Create a YouTube object
    yt = YouTube(url)
    if quality == "highest":
        # Download the video in the highest quality 1080p
        # (does not necessarily come with audio)
        video_path = yt.streams.get_highest_resolution().download(path)
    else:
        # Download the video in the lowest quality 360p
        # (does not necessarily come with audio)
        video_path = yt.streams.get_lowest_resolution().download(path)
    return video_path

video_id = "outcGtbnMuQ"

video_path = youtube_download(video_id,
quality="highest",path="../data/video")
# Extract frame at 18:27
import cv2
def extract_video_frame(video_path, time):
    # Load video
    cap = cv2.VideoCapture(video_path)
    # Get the frame rate
    fps = cap.get(cv2.CAP_PROP_FPS)
    # Get the total number of frames
    total_frames = cap.get(cv2.CAP_PROP_FRAME_COUNT)
    # Set the frame to extract
    minutes, seconds = map(int, time.split(':'))
    total_seconds = minutes * 60 + seconds
    frame_to_extract = total_seconds * fps
    # Extract the frame
    cap.set(cv2.CAP_PROP_POS_FRAMES, frame_to_extract)
    ret, frame = cap.read()
    # Save the frame
    frame_path = "../img/frame.jpg"
    cv2.imwrite(frame_path, frame)
    # Release the video capture
    cap.release()
    return frame_path

frame_path = extract_video_frame(video_path, time="18:27")
# Display the frame
Image.open(frame_path)

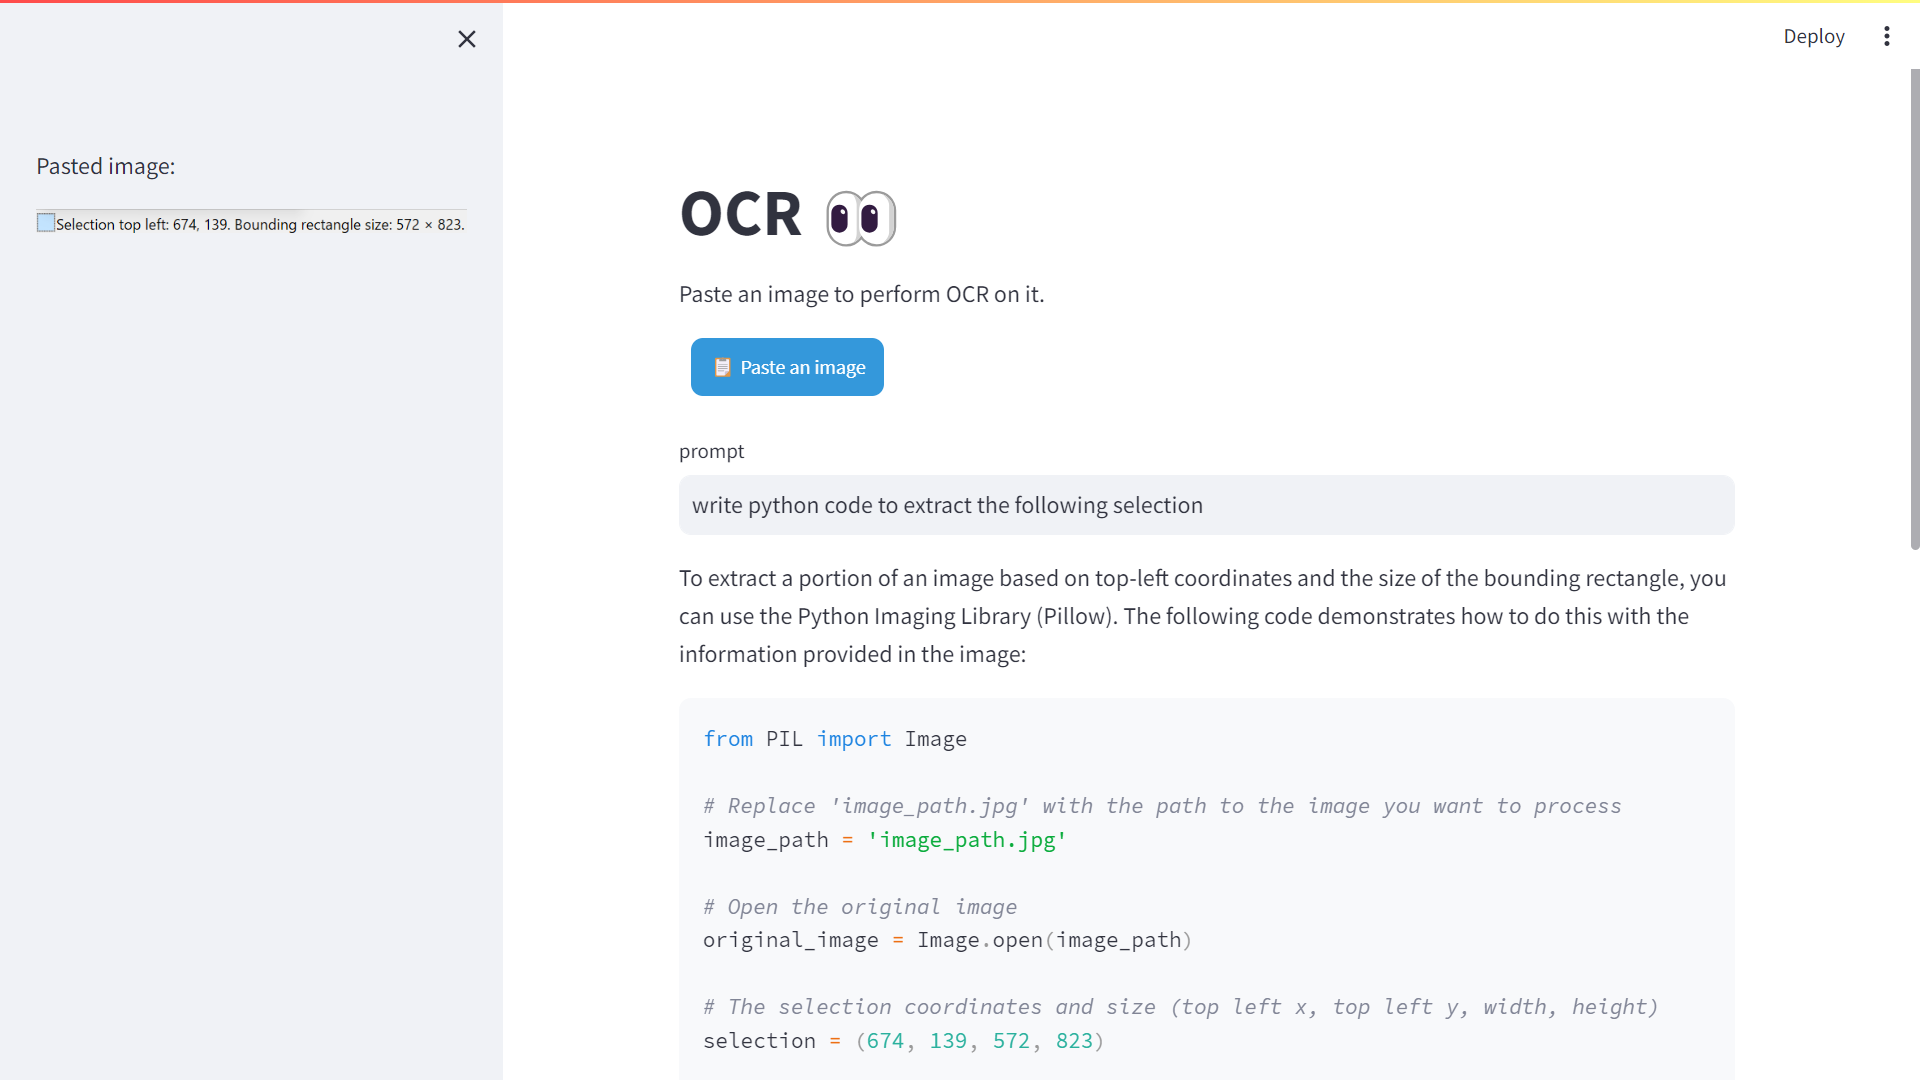
Now we need to crop the image. Let’s open up the frame in Paint.net, and grab the area to crop:

We can leverage our OCR assistant to write the python code to extract the selection.
from PIL import Image
# Open the original image
original_image = Image.open(frame_path)
# The selection coordinates and size (top left x, top left y, width,height)
selection = (449, 95, 383, 552)
# Calculate the bottom right coordinates (x2, y2)
x1, y1, width, height = selection
x2 = x1 + width
y2 = y1 + height
# Use the crop method to extract the area
cropped_image = original_image.crop((x1, y1, x2, y2))
# Save or display the cropped image
cropped_image_path = '../img/cropped_image.jpg'
cropped_image.save(cropped_image_path)
cropped_image
Let’s reuse the prompt from the demo:
original_prompt = "Write brief HTML/JS to turn this mock-up into a colorful website, where the jokes are replaced by two real jokes."
prompt = original_prompt + "\\n" + "Return only the code without markdown formating."
base64_image = encode_image(cropped_image_path)
code = chat_vision(prompt,base64_image)
with open("joke_website.html","w") as f:
    f.write(code)
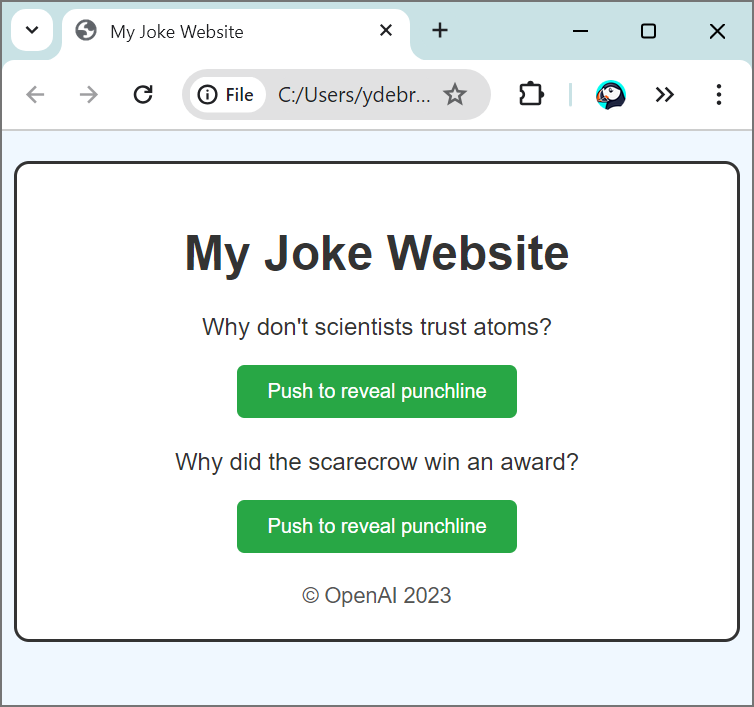
And Voila! We have our website coded for us (the resulted html is served up as a GitHub page):
https://yanndebray.github.io/programming-GPTs/chap7/joke_website
7.5. Video understanding
Let’s look at another use case: Processing and narrating a video with GPT’s visual capabilities and the TTS API[^6]. For this example, I will retrieve a video from Youtube that I created, and add a different voiceover.
from IPython.display import display, Image, Audio
from pytube import YouTube
import cv2, base64, time, openai, os, requests

video_id = "lBaEO836ECY"
video_path = youtube_download(video_id,
quality="lowest",path="../data/video")
video = cv2.VideoCapture(video_path)
base64Frames = []
while video.isOpened():
    success, frame = video.read()
    if not success:
        break
    _, buffer = cv2.imencode(".jpg", frame)
    base64Frames.append(base64.b64encode(buffer).decode("utf-8"))
video.release()
print(len(base64Frames), "frames read.")
2134 frames read.
display_handle = display(None, display_id=True)
for img in base64Frames:
    display_handle.update(Image(data=base64.b64decode(img.encode("utf-8")))
    time.sleep(0.025)
PROMPT_MESSAGES = [
    {
        "role": "user",
        "content": [
            "These are frames of a movie trailer. Create a short voiceover script in the style of Wes Anderson. Only include the narration.",
            *map(lambda x: {"image": x, "resize": 512},
base64Frames[0::60]),
        ],
    },
]

params = {
    "model": "gpt-4-vision-preview",
    "messages": PROMPT_MESSAGES,
    "max_tokens": 500,
}

result = openai.chat.completions.create(**params)
script = result.choices[0].message.content
print(script)
"In a world where equations come to life\... there exists an
extraordinary young man, Max.

Max, played by Timothée Chalamet, is no ordinary scientist. His
experiments defy the ordinary, boldly wander into the strange, and
occasionally, become magical.

With analog computers and whimsical algorithms, Max teams up with the
peculiar yet brilliant Professor Anderson, portrayed by Bill Murray.

Their journey through the enigmatic realms of MATLAB and Simulink
unfolds in a symphony of colorful chaos, eclectic technologies, and
serendipitous discoveries.

A journey where each computation sparks a revelation, every calculation
a wonder.

From the visionary mind of Wes Anderson comes 'MATLAB and Simulink: The
Symphony of Imagination'--- pulling the strings of reason, and plucking
the notes of creativity."
response = requests.post(
    "https://api.openai.com/v1/audio/speech",
    headers={
        "Authorization": f"Bearer
{os.environ['OPENAI_API_KEY']}",
    },
    json={
        "model": "tts-1-1106",
        "input": script,
        "voice": "onyx",
    },
)

audio = b""
for chunk in response.iter_content(chunk_size=1024 * 1024):
    audio += chunk
Audio(audio)

(Don’t try to click play on a book, it’s not going to work… go online instead)
with open("../data/audio/voiceover.mp3", "wb") as f:
    f.write(audio)
Let’s use MusicGen from Meta to add some music to the background.
The initial video is lasting 71 sec, let’s speed it up by a factor of 1.4, and save the result with voiceover.
from moviepy.editor import VideoFileClip, AudioFileClip
from moviepy.video.fx.speedx import speedx
video = VideoFileClip(video_path)
# Speed up the video by a factor of 1.4
speed_up_factor = 1.4
video = speedx(video, speed_up_factor)
audio = AudioFileClip("../data/audio/voiceover.mp3")
final_video = video.set_audio(audio)
# Save the modified video
final_video.write_videofile('../data/video/symphony_voiced_over.mp4',
codec="libx264")
Moviepy - Done !

Moviepy - video ready ../data/video/symphony_voiced_over.mp4