programming-matgpt
Build your own chatbot with MATLAB 🤖
In this tutorial you will discover the main APIs that OpenAI provides to interact with their GPT models. As an application of your learning, you will build your very first chatbot with MATLAB. It will look like this:
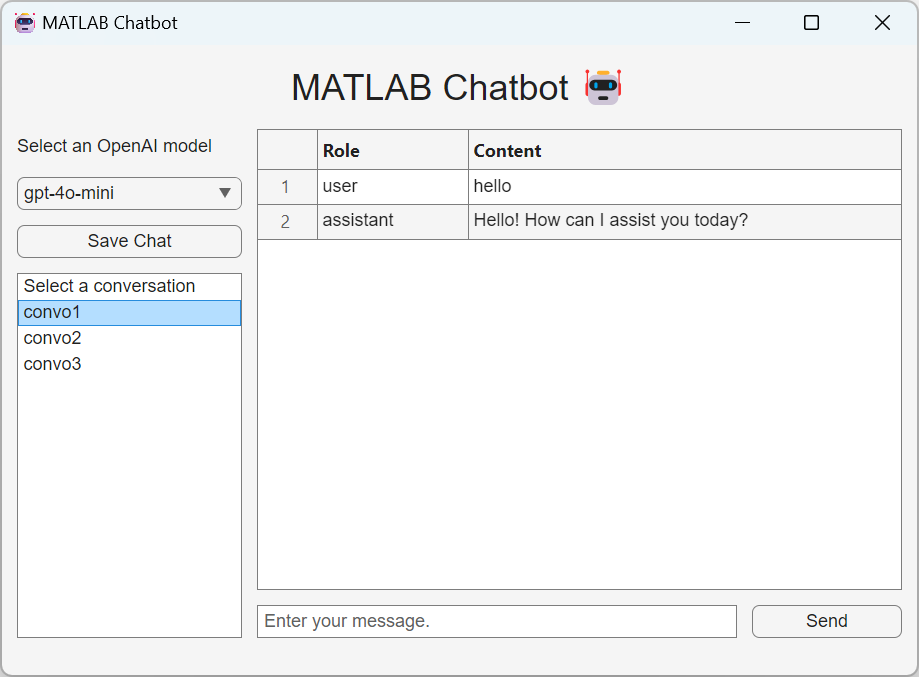
Figure 1 Your first chatbot app
Contents
- Setting up the Programming Environment
- Quick tour of the OpenAI developer platform
- Getting started with the chat completion API
- Prices of the API
- Build your first chatbot app
- Resources
Setting up the Programming Environment
This section will guide you through the necessary library and step-by-step setup process. I’ll take as assumption that you are running on a Windows machine. Wherever there is a major difference in OS, I’ll try to make sure that I give explanations for the different platforms.
Run the following line of code to automate the next two steps:
>> setup
Connect “LLMs with MATLAB”
Large Language Models (LLMs) with MATLAB1 (a.k.a. “LLMs with MATLAB”) is the official library provided by MathWorks for interacting with the OpenAI APIs as well as other LLMs. There are two ways you can install this library manually or programmatically:
-
Go to “Add-Ons” in the Home tab of MATLAB interface to open the Add-On Explorer.
-
Search “Large Language Models (LLMs) with MATLAB”.
-
Click “Add” to install the package.
-
Add it manually to your MATLAB path:

Or
folderName = 'llms-with-matlab';

if ~isfolder(folderName)

gitclone("github.com/matlab-deep-learning/llms-with-matlab");

else

disp('The folder already exists.');

end

addpath(genpath("llms-with-matlab")
API Keys and Authentication (For OpenAI)
Obtain an API key from OpenAI by registering on their platform. Set up the authentication to OpenAI by adding your API key to your environment variables with an .env file.
-
Create a new file in the editor:
>> edit .env -
Type *OPENAI_API_KEY=
* and save it as an .env file (the file won't appear by default in the file browser in MATLAB Online, but you can change this setting) -
Load your API key every time you start a new MATLAB session:
>> load(".env") -
Retrieve your API key:
>> getenv("OPENAI_API_KEY")
Test Installation
Verify your setup by running a small script to interact with the OpenAI API.
addpath("path/to/llms-with-matlab");

loadenv("path/to/.env");

client = openAIChat( ...

ApiKey=getenv("OPENAI_API_KEY"), ...

ModelName="gpt-4o-mini");

res = generate(client,"Say this is a test")
Quick tour of the OpenAI developer platform
First you will need to create an OpenAI account on their developer platform (platform.openai.com). Once you are logged in to your OpenAI account, the landing page of the developer platform will take you to a playground that enables you to get access to different kinds of models. The main kind of models are chat models on which I will focus for this chapter. But you will see other kinds of models in the rest of the book, like the Assistant and TTS (Text-To-Speech) models. Completion models are now considered legacy.
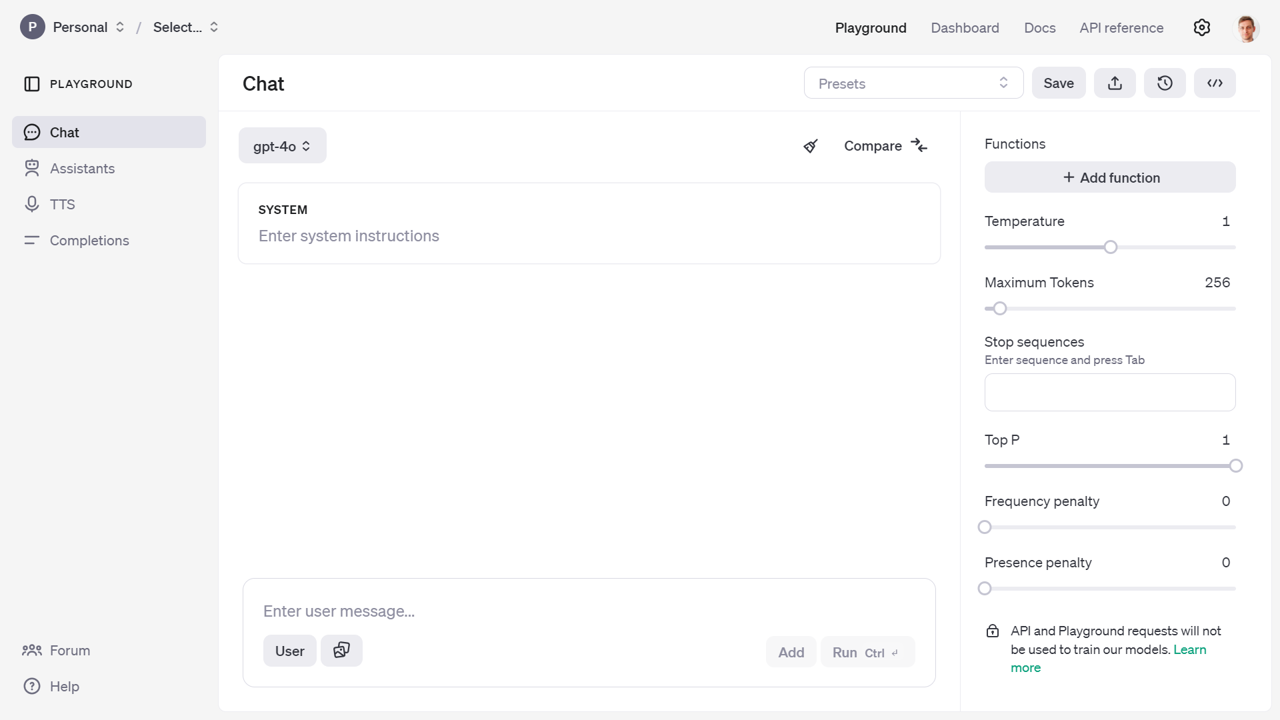
Figure 2 Play around in the playground and test the model APIs
This will give you an experience close to the one you have with the ChatGPT web app. But from there you will be able to access more advanced parameters of the model and view the code necessary to replicate the call to the API from your own program. If you are lacking inspiration, and you don’t know where to start, you will find some prompt examples from the presets in the documentation2.
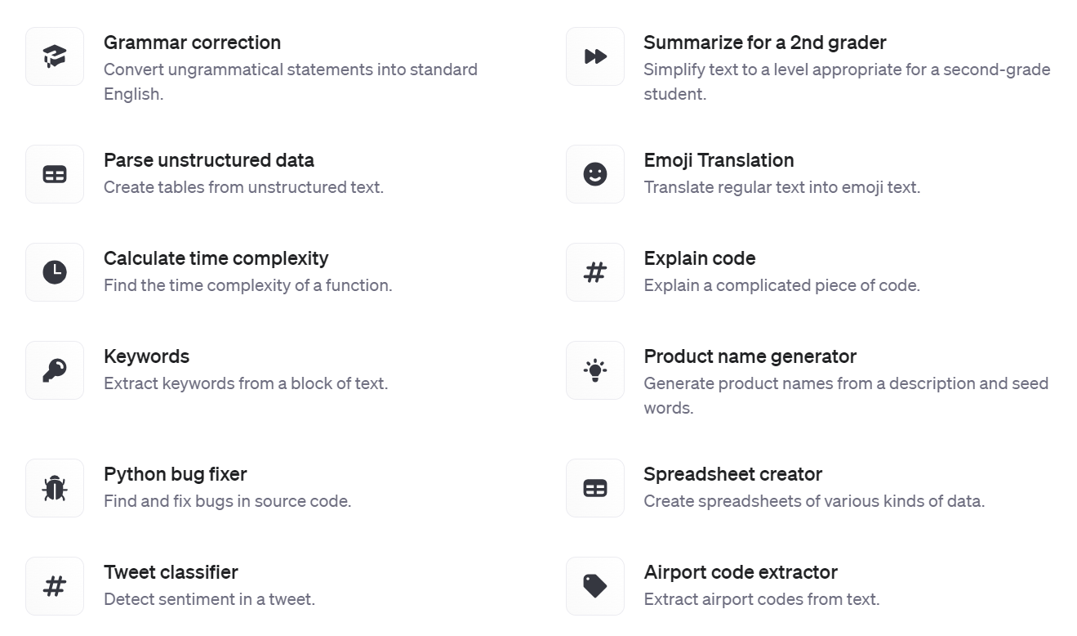
Figure 3 Prompt examples
If you want to take a guided look at the documentation3 before trying anything or go lower level to the definition of the functions in the API reference4.
Finally you can also access a dashboard to access management services:
-
Assistants: to create and manage your own assistant models
-
Fine-tuning: to fine-tune your own models
-
Batches: to manage your batch jobs
-
Storage: to manage files and vector stores
-
Usage: to give you a sense of your consumption of the OpenAI web services.
-
API keys: to manage your API keys
/!\ As an important data privacy disclaimer, API and Playground requests will not be used to train OpenAI models. This isn’t the case of the public ChatGPT App, which by default can learn from users’ conversations.
Getting started with the chat completion API
A message to the chat completion API is made up of role and content. There are three distinct roles: system, user, and assistant.
- System: This is the initial instruction for the LLM that guides its subsequent responses and actions, known as “system prompt”. It serves as context for the rest of the conversation, forcing the chat to behave in a certain way. Some developers have found success in continually moving the system message near the end of the conversation to keep the model’s attention from drifting away as conversations get longer. You can set the system prompt when you initialize openAIChat.
% Load environment variables and initialize the chat client with a
system prompt

loadenv("path/to/.env");

chat = openAIChat("If I say hello, say world", ...

ApiKey=getenv("OPENAI_API_KEY"), ...

ModelName="gpt-4o-mini");
-
User: This is the prompt a user provides to the LLM.
-
Assistant: This is the response from the LLM.
To add your prompt, initialize OpenAIMessages and use addUserMessage to add your message.
% Initialize message history and add a user query

messages = messageHistory;

messages = addUserMessage(messages,"hello");

[txt,msgStruct,response] = generate(chat,messages);

disp(txt) % world
We can add the response to the messages using addResponseMessage to continue the conversation without losing the previous exchanges.
messages = addResponseMessage(messages, msgStruct);
Here is the content of messages:
>> messages.Messages{1}

ans =

struct with fields:

role: "user"
content: "hello"

>> messages.Messages{2}

ans =

struct with fields:

role: "assistant"
content: "world"
As you can see from the messages object passed to the OpenAI chat client, it consists of a cell array of struct, each entry containing a role (either user or assistant) and a content entry.
Let’s save the messages in a .mat file in a “chat” folder for later use:
save(fullfile("chat","convo1.mat"),"messages");
You can convert the messages to a table for better visualization:
% Display the message history as a table

msgCells = messages.Messages;

msgStructArray = [msgCells{:}];

T = struct2table(msgStructArray);

disp(T)
The table output will look like:
Table 1 Chat History
| role | content |
|---|---|
| user | hello |
| assistant | world |
The messages can contain as many user and assistant exchanges as you want, as long as you do not exceed the model’s context window. For GPT-4o5, the number of tokens accepted is 128k. Inputs and outputs tokens are summed, but outputs cannot exceed 16,385 tokens.
Additional parameters can be passed when creating the OpenAI Chat client or generating a response (like max number of tokens, number of responses to generate, and streaming option).
Prices of the API
The prices6 have evolved quite a bit since the introduction of the ChatGPT API. As of the time of this writing (gpt-4o-2024-11-20):
Table 2 Prices of the API
| model | input price ($$ per 1M tokens$) | output price ($$ per 1M tokens$) |
|---|---|---|
| gpt-4o-mini | $0.150 | $0.600 |
| gpt-4o | $2.5 | $10 |
/!\ Make sure to check the latest prices of the API, and consider how you could be submitting your request as a batch7. Responses will be returned within 24 hours for a 50% discount. If some of your input tokens are repeated across requests, they will be automatically cached8 giving you 50% discount compared to uncached prompts.
To give you a sense of the cost of using the API on a daily basis, here is a view over the month of May, where I spend the most of my time writing this book and developing the associated GPTs.
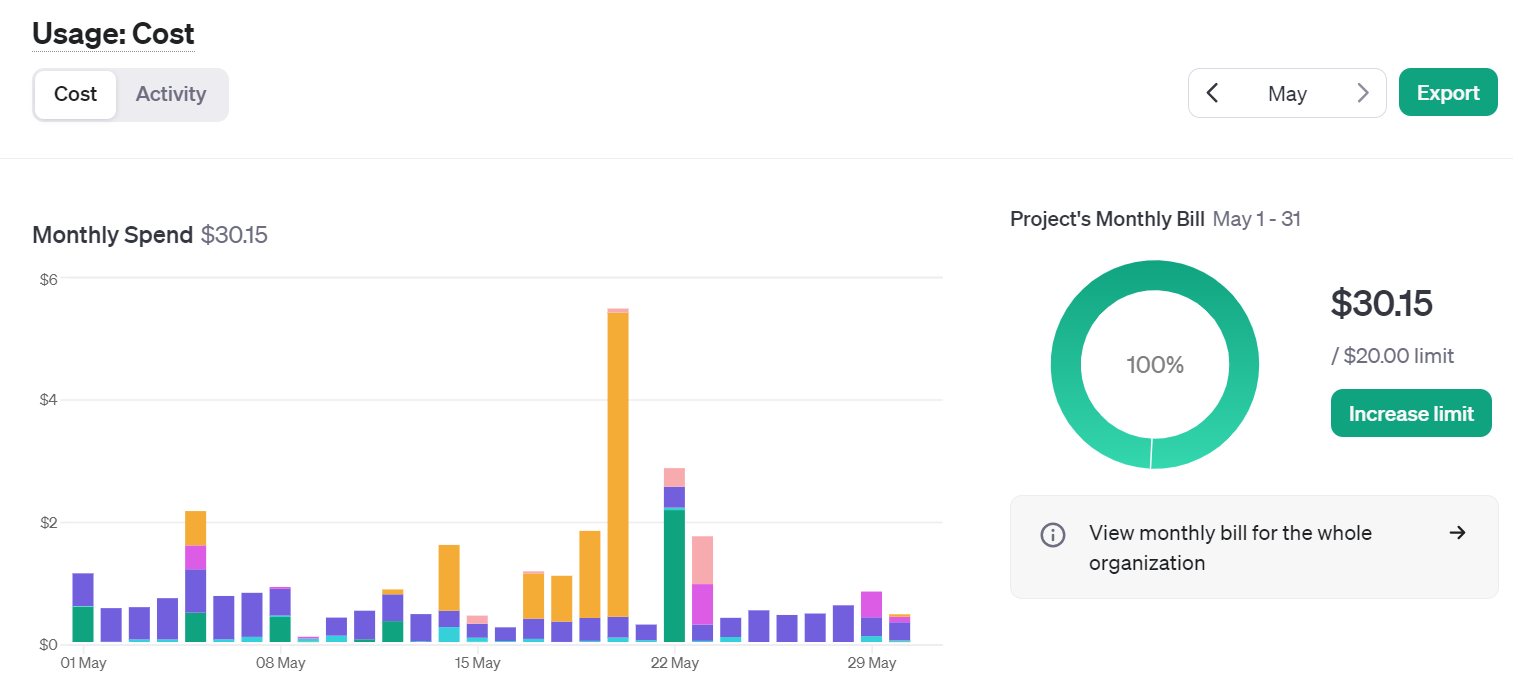
Figure 4 Cost of OpenAI services over the period of a busy month
If you hover over the graphic, you can see the breakdown by service (image, audio, embeddings, …) or by model (3.5, 4o, …). The big spike mid-month was due to the Dall-E 3 service usage for over $5 on 1 day.
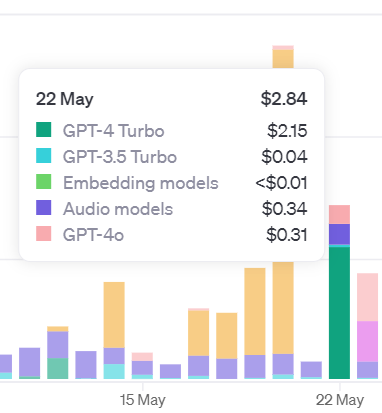
Figure 5 Breakdown of the cost per service
You can add email alerts and set budget limits to control your spending. As I started integrating more AI into my apps over the year, I ended up creating new keys for each project, and even distributing keys to friends and colleagues:

Figure 6 Table of active OpenAI keys
This enabled me to have a finer grain control over the different projects including AI. You now have the ability to actually create a “project” that can contain members and have dedicated limits attached to it
Build your first chatbot app
In this section, you will learn how to build your very first chatbot application, leveraging the OpenAI APIs. You will start by experiencing the basics of building applications in MATLAB. The resulting app is stored on GitHub in the file chatbot.m, and I will walk you step by step through the development of such an app.
I will break down the development of the chatbot into the following steps:
-
Graphical components: Define the basic user interactions with the app
-
Chat elements: Display the chat conversation as a table in the main area, and implement convenience functions to save and load the chat history
-
User data: Store the state of your app in a user variable to simplify the interaction schema
-
Response streaming: Display the response as it is being generated
Graphical Components
This part is going to focus more on the MATLAB app-building framework. Typically, we use App Designer9 to design MATLAB apps interactively. You can also create simple apps programmatically. Let’s start with that approach. Figure 2-7 represents a simple app built in a MATLAB UI figure window.
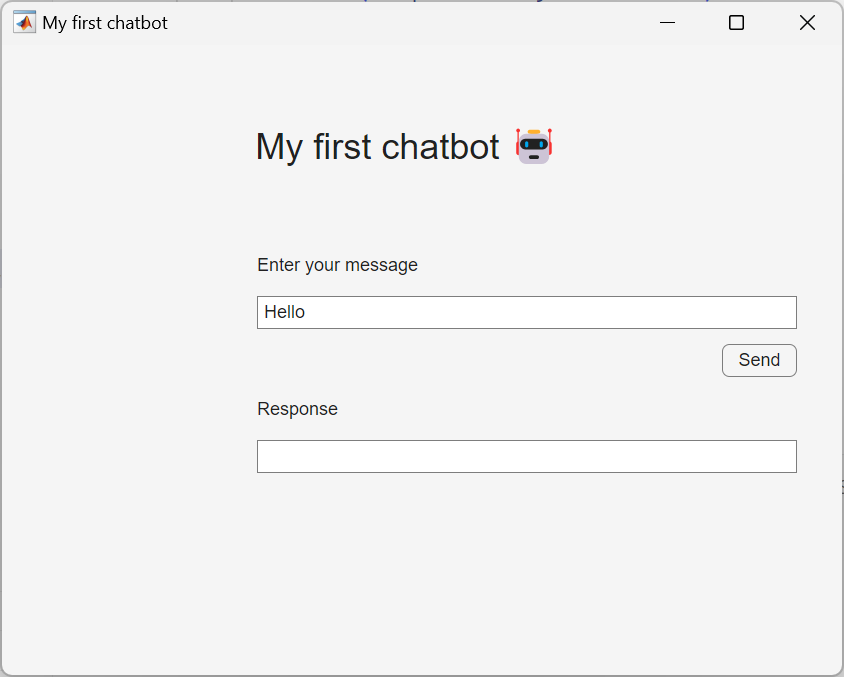
Figure 7 Simple chat user interface
This is the code for the first chat Graphical User Interface in MATLAB:
% create a UI figure window

fig = uifigure(Name="My first chatbot");

% add a 7x4 grid

g = uigridlayout(fig);

g.RowHeight = {'1x',22,22,22,22,22,'1x'};

g.ColumnWidth = {150,300,50,'1x'};

% add a title

ttl = uilabel(g,Text="My first chatbot 🤖");

ttl.HorizontalAlignment = "center";

ttl.FontSize = 24;

ttl.Layout.Row = 1;

ttl.Layout.Column = [1,3];

% add an input field

eflabel = uilabel(g,Text="Enter your message");

eflabel.Layout.Row = 2;

eflabel.Layout.Column = 2;

ef = uieditfield(g);

ef.Layout.Row = 3;

ef.Layout.Column = [2,3];

ef.Value = "Hello";

% add an output field

oflabel = uilabel(g,Text="Response");

oflabel.Layout.Row = 5;

oflabel.Layout.Column = 2;

of = uieditfield(g);

of.Layout.Row = 6;

of.Layout.Column = [2,3];

% add a button

btn = uibutton(g,Text="Send") ;

btn.ButtonPushedFcn=@(src,event) chat(ef,of);

btn.Layout.Row = 4;

btn.Layout.Column = 3;

% this function runs when the button is clicked

function chat(inputField,outputField)

systemPrompt = "If I say hello, say world";

% modify this depending on which release you use

client = openAIChat(systemPrompt, ...

ModelName="gpt-4o-mini");

% ApiKey=getenv("OPENAI_API_KEY")

prompt = string(inputField.Value);

[txt,msgStruct,response] = generate(client,prompt);

if isfield(response.Body.Data,"error")

error(response.Body.Data.error)

else

outputField.Value = txt;

end

end
You will need to define all the local functions at the end of the script file unless you use R2024a or later (In the latest versions of MATLAB, you can define local functions anywhere in a script).
MATLAB apps are built on a UI figure10 window. It is a good practice to add a UI grid layout11 to the UI figure to organize UI components within the UI figure.
The basic elements that are useful for any basic app are the UI edit field12 and the UI button13, which lets you define the app behavior in a callback function.
As mentioned in the preface section about authentication, the API key is stored locally in a file .env. and loaded via the setup.mlx file. You also need to make sure that the LLMs-with-MATLAB repo is on the MATLAB path, as well as its subfolder, as part of the setup.
We can gradually increase the complexity of the app, by adding a UI dropdown14 to choose the model before the UI button definition:
% add a dropdown before the button

items = ["gpt-4o-mini","gpt-4o"];

dd = uidropdown(g,Items=items);

dd.Layout.Row = 2;

dd.Layout.Column = 1;
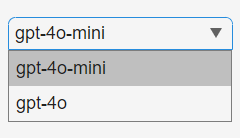
Figure 8 Model selection with drop-down menu
You also need to update the callback function in the UI button to include the UI dropdown to the input arguments.
% update the callback input arguments

btn.ButtonPushedFcn=@(src,event) chat(dd,ef,of));

Here is the updated function definition:

function chat(selection,inputField,outputField)

systemPrompt = "If I say hello, say world";

% modify this depending on which release you use

client = openAIChat(systemPrompt, ...

ApiKey=getSecret("OPENAI_API_KEY"), ...

ModelName=selection.Value);

prompt = string(inputField.Value);

[txt,msgStruct,response] = generate(client,prompt);

if isfield(response.Body.Data,"error")

error(response.Body.Data.error)

else

outputField.Value = txt;

end

end
A drop-down element hides the selection to only reveal the selected option. An alternative way to display multiple choices is to use radio buttons. This other type of graphical component enables a finite number of choice options to be displayed for an exclusive selection of one only (unlike checkboxes that enable multiple choices).
Chat Elements
The simple app you just built can only handle a single-turn chat. To support a multi-turn chat, you need to use a UI component that can show multiple lines of text. One such component is the UI table15.
% create a ui figure window

fig = uifigure(Name="My conversation table");

% set the figure size

fig.Position(end) = 150;

% add a 3x1 grid

g = uigridlayout(fig,[3,1]);

g.RowHeight = {80,22,'1x'};

% add a table

uit = uitable(g);

uit.Data = ["user","hello";"assistant","world"];

uit.ColumnName = ["Role","Content"];

uit.Layout.Row = 1;

% add an input field

ef = uieditfield(g,Placeholder="Enter your message");

ef.Layout.Row = 2;
As you can see from the structure of the code, the rendering of the messages will be done after a new message has been added to the Data property of the UI table. Please note that the input field is placed below the table with a placeholder text.
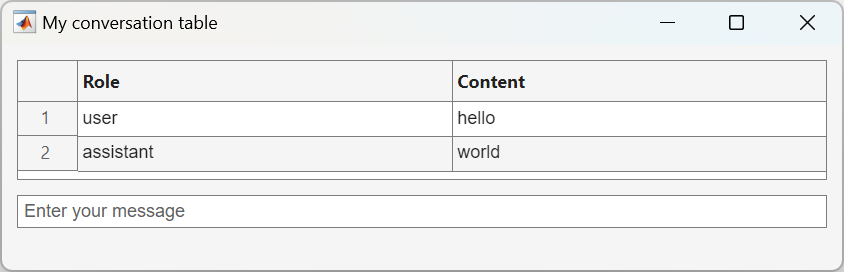
Figure 9 A basic chat dialog
In order to start building a chat that has more than one question and one answer (not much of a chat), you will save the conversation and load it back (making the app stateless and relying on storing the history to disk).
First let’s start by loading an existing conversation, with a function called load_chat that loads a chat history for debugging:
function load_chat(listbox, outputField)

historyfile = fullfile("chat", listbox.Value + ".mat");

if isfile(historyfile)

load(historyfile, "convo");

roles = cellfun(@(x) string(x.role), convo.Messages');

contents = cellfun(@(x) string(x.content), convo.Messages');

outputField.Data = [roles, contents];

else

outputField.Data = [];

end

end
The chat history is stored in a .mat file in the chat folder. The chat history is loaded from the file and then displayed in the output field.
You also need a function to populate a listbox with available filenames.
function list_history(inputField)

if isfolder("chat")

s = dir("chat");

isMat = arrayfun(@(x) endsWith(x.name, ".mat"), s);

filenames = arrayfun(@(x) string(x.name), s(isMat));

else

mkdir("chat");

filenames = [];

end

items = "Select a conversation";

if ~isempty(filenames)

filenames = extractBefore(filenames, ".mat");

items = [items, filenames'];

end

inputField.Items = items;

end
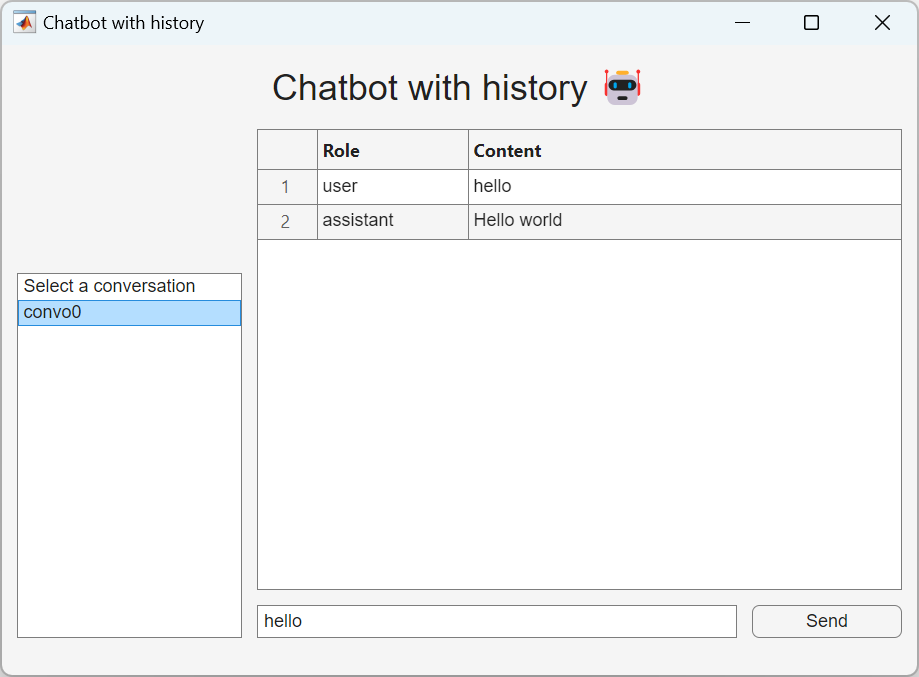
Figure 10 Conversation history stored as mat file
You can call those functions as follows.
% Chatbot with history

% Create the uifigure with minimal width.

initialHeight = 420; initialWidth = 610;

fig = uifigure("Name", "ChatGPT-like bot");

fig.Position = [100 100 initialWidth initialHeight];

% Add an 8x5 grid layout

g = uigridlayout(fig);

g.RowHeight = {'1x',22,22,22,'5x',22,22,5};

g.ColumnWidth = {150,100,200,'1x',100};

% Title label

ttl = uilabel(g, "Text", "ChatGPT-like bot 🤖");

ttl.FontSize = 24;

ttl.Layout.Row = 1;

ttl.Layout.Column = [1,5];

ttl.HorizontalAlignment = "center";

% Table to show the conversation

uit = uitable(g);

uit.ColumnWidth = {100, '1x'};

uit.ColumnName = ["Role", "Content"];

uit.Layout.Row = [2,6];

uit.Layout.Column = [2,5];

% Dropdown for conversation history

dd = uidropdown(g);

list_history(dd);

dd.ValueChangedFcn = @(src,event) load_chat(dd, uit);

dd.Layout.Row = 3;

dd.Layout.Column = 1;
Second let’s define the chat function. While designing the behavior of the app, I’d recommend avoid calling OpenAI each time by creating a dummy chat function:
function dumb_chat(inputField, dropdown, convo)

prompt = string(inputField.Value);

convo = addUserMessage(convo, prompt);

txt = "Hello world";

msgStruct = struct("role", "assistant", "content", txt);

convo = addResponseMessage(convo, msgStruct);

save_chat(convo, "convo0");

list_history(dropdown);

end
You need to output the conversation outside of the function. However, this function is called from a button click, so there is no direct way to output the conversation to use elsewhere. To solve this problem, you save the conversation to a local file using the save_chat function:
function save_chat(convo, filename)

historyfile = fullfile("chat", filename + ".mat");

save(historyfile, "convo");

end
You can implement additional UI components and logic to accept user input and save the conversation to a file.
% Input field for messages

ef = uieditfield(g, Placeholder="Enter your message.");

ef.Layout.Row = 7;

ef.Layout.Column = [2,4];

% Send button for the chat (run button)

sendBtn = uibutton(g, Text="Send");

sendBtn.ButtonPushedFcn = @(src,event) dumb_chat(ef, ld,
openAIMessages);

sendBtn.Layout.Row = 7;

sendBtn.Layout.Column = 5;
When you send your message by clicking on the button, the conversation is saved in the “convo1.mat” file and you can display it by selecting “convo1” in the dropdown.
User Data
In the previous section, you have seen how to save and load a conversation. But you don’t really want to be writing to disk every element of our app that needs to store a state. When you design an app, you need to store app data to be shared across various callback functions. The best way to store data is to use the UserData property of the top-level UI figure, because it is accessible from all other UI components. In our example, you need to manage the state of the conversation as it is loaded, updated and saved.
By storing the conversation in the UserData property of the UI figure, you can access it from any child component using ancestor16 function:
fig = ancestor(uicomponent,"figure","toplevel");

fig.UserData
Let’s see how this works in the updated dumb_chat function:
function dumb_chat(inputField,outputField)

% use ancestor to get the fig

fig = ancestor(inputField,"figure","toplevel");

% get the messages from the UserData property of the fig

convo = fig.UserData;

prompt = string(inputField.Value);

if isempty(outputField.Data)

outputField.Data = ["user",prompt];

else

outputField.Data = [outputField.Data;"user",prompt];

end

convo = addUserMessage(convo,prompt);

txt = "Hello world";

msgStruct = struct("role","assistant","content",txt);

convo = addResponseMessage(convo,msgStruct);

% update the UserData property of the fig

fig.UserData = convo;

outputField.Data = [outputField.Data;"assistant",txt];

inputField.Value = "";

end
The save_chat function is no longer used in the dumb_chat function. Let’s repurpose it so that it can be called from a button.
function save_chat(inputField,outputField)

fig = ancestor(inputField,"figure","toplevel");

convo = fig.UserData;

if ~isempty(convo.Messages)

% create a new filename based on the folder content

s = dir("chat");

isMat = arrayfun(@(x) endsWith(x.name,".mat"), s);

filenames = arrayfun(@(x) string(x.name), s(isMat));

if isempty(filenames)

filename = "convo1";

else

filenames = extractBefore(filenames,".mat");

suffix = str2double(extractAfter(filenames,"convo"));

filename = "convo" + (max(suffix) + 1);

end

historyfile = fullfile("chat", filename + ".mat");

save(historyfile,"convo");

list_history(inputField);

end

% reset the UserData and output field

fig.UserData = openAIMessages;

outputField.Data = [];

end
Then you need to initialize the UserData property of the UI figure when you build the app:
% initialize the UserData property in the UI figure

fig = uifigure(Name="ChatGPT-like bot");

fig.UserData = openAIMessages;

Let's add a new button that called the save_chat function before the
"Send" button.

% add a save chat button

saveBtn = uibutton(g,Text="Save Chat");

saveBtn.ButtonPushedFcn=@(src,events) save_chat(uit,dd);

saveBtn.Layout.Row = 4;

saveBtn.Layout.Column = 1;
You also need to update the input arguments for the callback function for the input field:
% modify the function input arguments

sendBtn.ButtonPushedFcn=@(src,event) dumb_chat(ef,uit);
Response Streaming
Finally, one small thing is missing to make the app look and feel just like ChatGPT. You will modify the call to the OpenAI chat completion API, by adding the parameter StreamFun.
Setting StreamFun in a client makes the model return tokens as soon as they are available, instead of waiting for the full sequence of tokens to be generated. It does not change the time to get all the tokens, but it reduces the time for the first token for an application where you want to show partial progress or are going to stop generations. This can be a better user experience and a UX improvement so it’s worth experimenting with streaming.
Here is the code that replaces the dumb_chat function:
function chat_stream(dropdown,inputField,outputField)

% modify this depending on which release you use

client = openAIChat(ModelName=dropdown.Value, ...

ApiKey=getSecret("OPENAI_API_KEY"), ...

StreamFun=@(x) printStream(outputField,x));

fig = ancestor(inputField,"figure","toplevel");

convo = fig.UserData;

prompt = string(inputField.Value);

if isempty(outputField.Data)

outputField.Data = ["user",prompt];

else

outputField.Data = [outputField.Data; "user",prompt];

end

convo = addUserMessage(convo,prompt);

[txt,msgStruct,response] = generate(client,convo);

convo = addResponseMessage(convo,msgStruct);

if isfield(response.Body.Data,"error")

error(response.Body.Data.error)

else

fig.UserData = convo;

outputField.Data(end) = txt;

inputField.Value = "";

end

end
Additionally, you need to define the function for the StreamFun parameter:
function printStream(h,x)

data = string(h.Data);

if strlength(x) == 0

data = [data; "assistant",string(x)];

else

data(end) = data(end) + string(x);

end

h.Data = data;

pause(0.1)

end
Let’s update the dropdown so that you can use it to choose a model:
% replace the dropdown

ddlabel = uilabel(g,Text="Select an OpenAI model");

ddlabel.Layout.Row = 2;

ddlabel.Layout.Column = 1;

dd = uidropdown(g,Items=["gpt-4o-mini","gpt-4o"]);

dd.Layout.Row = 3;

dd.Layout.Column = 1;

% replace dumb_chat with chat_stream

sendBtn.ButtonPushedFcn=@(src,events) chat_stream(dd,ef,uit);
Now you should be able to stream the response from the API.
Before you finish, you need to make one more change. Since you updated the dropdown to select a model, you lost the ability to load a chat history. Let’s add a few more things to complete the app.
% add a listbox

lb = uilistbox(g);

list_history(lb);

lb.ValueChangedFcn = @(src,events) load_chat(lb,uit);

lb.Layout.Row = [5,7];

lb.Layout.Column = 1;
You also need to update some functions.
function load_chat(listbox,outputField)

historyfile = fullfile("chat", listbox.Value + ".mat");

if isfile(historyfile)

load(historyfile,"convo");

fig = ancestor(outputField,"figure","toplevel");

fig.UserData = convo;

roles = cellfun(@(x) string(x.role), convo.Messages');

contents = cellfun(@(x) string(x.content), convo.Messages');

outputField.Data = [roles,contents];

else

outputField.Data = [];

end

end
Congratulations 🎉 You have created your first chatbot. If you assemble the learnings from the previous sections, you will be able to replicate the code in this example in chatbot.m.
Resources
This tutorial is getting inspiration from: